Few quick tips that make life easier :)
Face masks
I always applied face masks with my fingers. And I hate that, I can never get even layer, mask gets under my nails, and all over my fingers, and I basically trow away what gets left on my fingers when I wash them.
So one day, I thought why not use a brush. Beauticians in salons use brushes.
I used ELF foundation brush, it was lying around useless. It's not good for foundation, but it's great for face masks. Any cheap foundation or fan brush, would be great.
Nail polish
Are you in a rush? Just hate waithing for hours for your nailpolish to dry? Why not use a hair blow dryer? I sound like a comercial :D. Just set it on cold or lowest heat and in few minutes your nails would be completely dry. Make sure you prepare your dryer before applying nailpolish.
I just love dark shades of polishes, but since I'm not to precise, somethimes I get nailpolish on my skin. I clean it all off right away, but somethimes, it stains the skin and I can't get it off without messing my manicure.
After the polish is completely dry, simply use nail brush and some soap and gently brush all the stains off.
Nose pore strips
To make them more efficient, use this few simple steps.
Steam your face or apply the after shower. Use a scrub or peeling gel and gently scrub the area before applying the nose strip. After applying nose strip, wet your hand, and lightly dab all over the nose strip, but don't soak it too much with water. It sticks better this way. Leave the nose stip on for half an hour or more, until it's really dry and stiff. Remove it and use cold cloth or rub an ice cube over the area to close the pores.
Creasing shadow
I have oily hooded lids. So all shadows (drugstore or high end) either crease or simply vanish from moving part of the lid (from lashes to crease) regardless of shadow base/primer and I tried whole bunch of them.
I got this great tip from another blogger Maybe's New Start. After you apply your eyeshadows, just before appling maskara, with a fluffy brush, blend some translucent face powder all over the lid. It really works. It stops my eyeshdows from creasing for 5-6 hours and more. Usually it strarts to crease after
2-3 hours tops.
If you have any usefull tips, do share :)
12/28/2011
12/22/2011
Decorative gift box
Instead of buying a box, why not make one. You can choose the materials and box size.


What you need:


- cardboard box
- materials: textile, rice paper, wrapping paper, self-adheseve wallpaper
- double sided sticky tape
- all purpose glue
- scissors
- ruller
Cut the chosen material to fit the dimension of the box, but leave 1/4 inch more on the edges.
If you're coating the box with self-adheseve wallpaper, all you need is box and wallpaper.
Starting at the bottom, slowly apply wallpaper, making sure there are no air bubbles. And then continue ond the sides, making sure all edges are nicely together.
If you're using textiles or paper, you will need double sided sticky tape and glue.
When it comes to textiles choose ones that don't tear, or when you cut them there are no treads coming out.
Coat entire outside of the box with tape. Starting at the bottom, attach material to the box. Make sure that textile is tight so there would be no wrinkles.
If you wish, you can coat the box with thin layer of glue so material would adhere better. Leave to dry well.
If you like you can do aditional decorating.
Boxes don't look perfect.
Small box is coated with self adheseve wallpaper. Black flowers are plush material on regular white wallpaper, so it has texture. Red and white ribbons were bought at fabric goods store.
Small box was an experiment and I wasn't too carefull, so you can see traces of glue (I scraped it off later). I used it to try some techniques. That's why the bow is uspide down, I got the idea at the end :D.

In the end, I sprinkled some fine white glitter all over the box.


Blue box was coated with wraping paper that stuck to tape very fast and very strong so I couldn't fix all that wrinkles. I just hid them with layer of glitter. And since box is intended for keeping snow ball ornaments, I think it looks very festive :D.


Decorations on the box are felt, and I bought them for very cheap as table decoration.
Few years ago I use this material for coating the box.


It looked very soft and furry :D, and I had enough left to make a scarf. Sadly, I didn't remember to take a picture.
12/16/2011
Snow ornament balls
Continuing with Xmas theme :)
This post would be lot shorter, and the making will be lot simpler.
What you need:


In one bowl/plate mix small amount of glue and snow (approximate amounts) to get a thick paste. First add small amount of glue, mix into paste and try if it sticks to the ball. If not, add more glue.


This post would be lot shorter, and the making will be lot simpler.
What you need:
- styrofoam balls (any diameter)
- all purpose glue
- fake snow
- glitter (optional)
- thin ribbon
- hot glue gun and glue
- 2 plastic bowls or plates, anything that can be tossed later
- latex gloves

I suggest making the balls outside or in a area that can be easily cleaned, since the snow will fly around.
Let's get strarted.
Cut the ribbon in to desired lenght, fold in half and tie the ends in a knot. With scissors, make a small hole on the top of the ball and push the knot in the hole. Secure with hot glue.


In one bowl/plate mix small amount of glue and snow (approximate amounts) to get a thick paste. First add small amount of glue, mix into paste and try if it sticks to the ball. If not, add more glue.


Coat the ball with thin layer of snow paste and pack it tightly.


In other bowl/plate add some snow. You can mix in glitter if you like.
Then, coat the ball with dry snow.


Leave to dry well. It would be best if you can hang it somewhere.
Once dried, balls are ready to go on Xmas tree :).

If you plan on giving them away, place them in a box coated with soft lining, and try to move them as less as posible, cause there will be some fall out.
Store them in closed box, cause they can get dirty form dust.
12/09/2011
Xmas ball ornaments
It's Christmas season so it's only logical that my first post is Christmas related :)
Last year I saw similar thing in one store, and I decided to make my own. My philosophy is why buy when you can make it :D. They are really nice and unique gift. If noting, you made it and I'm sure people would appreciate the effort :).
In this post I will try to explain the procedure in very detailed way. So, this is gonna be rather long post :).
I know, you're thinking: why in hell didn't she just do a video and post it on YT. Belive me, I would if I could.
Anyway, I hope you like it, and find it helpful.
All materials were bought in local art supply shop and fabrics store.
Materials:
Tools:

Optional:

Let's get started.


You can use hot glue (middle), but it takes long time (I did that with my first ball :D).

Make sure that you don't use too much glue, or is't to hot, cause you can burn yourself. Also, if the glue is too hot, it melts the styrofoam and you get holes. That isn't such a problem since loops cover everything.


Movin' on. Select a spot where you gonna start adding loops. Use a small amount of glue and just glue one end of the loop. Make sure only the top (sewn part) is attached to the ball and the rest of the loop is free.


Place the completed ball on a flat surface and with the tip of the scissors make a small hole.


Last year I saw similar thing in one store, and I decided to make my own. My philosophy is why buy when you can make it :D. They are really nice and unique gift. If noting, you made it and I'm sure people would appreciate the effort :).
In this post I will try to explain the procedure in very detailed way. So, this is gonna be rather long post :).
I know, you're thinking: why in hell didn't she just do a video and post it on YT. Belive me, I would if I could.
Anyway, I hope you like it, and find it helpful.
All materials were bought in local art supply shop and fabrics store.
Materials:

- styrofoam ball: 6 centimeter/2.4" in diameter
- satin ribbon: 2.5 cm/1" wide; 3 meter/approx 10 ft long
- satin ribbon: 0.5 cm/0.2" wide; 0.5m/approx 1,7 ft long
- beads
Tools:

- hot glue gun
- glue
- scissors
- measuring tape, ruler
- sewing machine/needle and thread
Optional:

- glitter
- transparent textile glue
- glitter glue
- brush
- glitter hairspray
Let's get started.
Cut wide ribbon in four 10 cm/4" long pieces. Cut the rest of the ribbon in 6.5 cm/2.6" long pieces. You don't have to be too precise, but try to be as precise as posible.

Connect the ends of the smaller pieces (6 cm / 2.6") to make loops. I sewn them together usine sewing machine, but you can use needle and tread. It doesn't need to be perfect, they just need to be connected.

You can use hot glue (middle), but it takes long time (I did that with my first ball :D).
Here comes the fun part :).
Aply small amount of glue on the bottom of the ball and place the longer piece of the ribbon (10cm/4" long) in the center. To avoid those glue strings that you get, after applying glue, gently press the tip of the glue gun to the ball surface.
Now add small amount of glue and attach the ends of the ribbon. Pull the end of the ribbon and smooth it, so it adheres to the ball tightly. Tighten the ends and glue them.

Make sure that you don't use too much glue, or is't to hot, cause you can burn yourself. Also, if the glue is too hot, it melts the styrofoam and you get holes. That isn't such a problem since loops cover everything.
Do the same with the rest od the pieces, placing second piece verticaly to first, and last two pieces should be rotated 45° in regard to first two. You must cover all the styrofoam.

Now you made the bottom of the ball.

Now you made the bottom of the ball.


Movin' on. Select a spot where you gonna start adding loops. Use a small amount of glue and just glue one end of the loop. Make sure only the top (sewn part) is attached to the ball and the rest of the loop is free.

Place the second loop to owerlap the first. And do the whole circle.


The loop on the right is the last one, and one od the left is the fist, free corner is visible.

Start the second row by placing the first loop in the middle of the bottom two and continue as before. Do the same for all rows. You should have 5 rows.


Start the second row by placing the first loop in the middle of the bottom two and continue as before. Do the same for all rows. You should have 5 rows.


Last row (fifth) is made little differently. Before you glue the loop, crimp it. You can sew it to make life easier :).


Place the completed ball on a flat surface and with the tip of the scissors make a small hole.
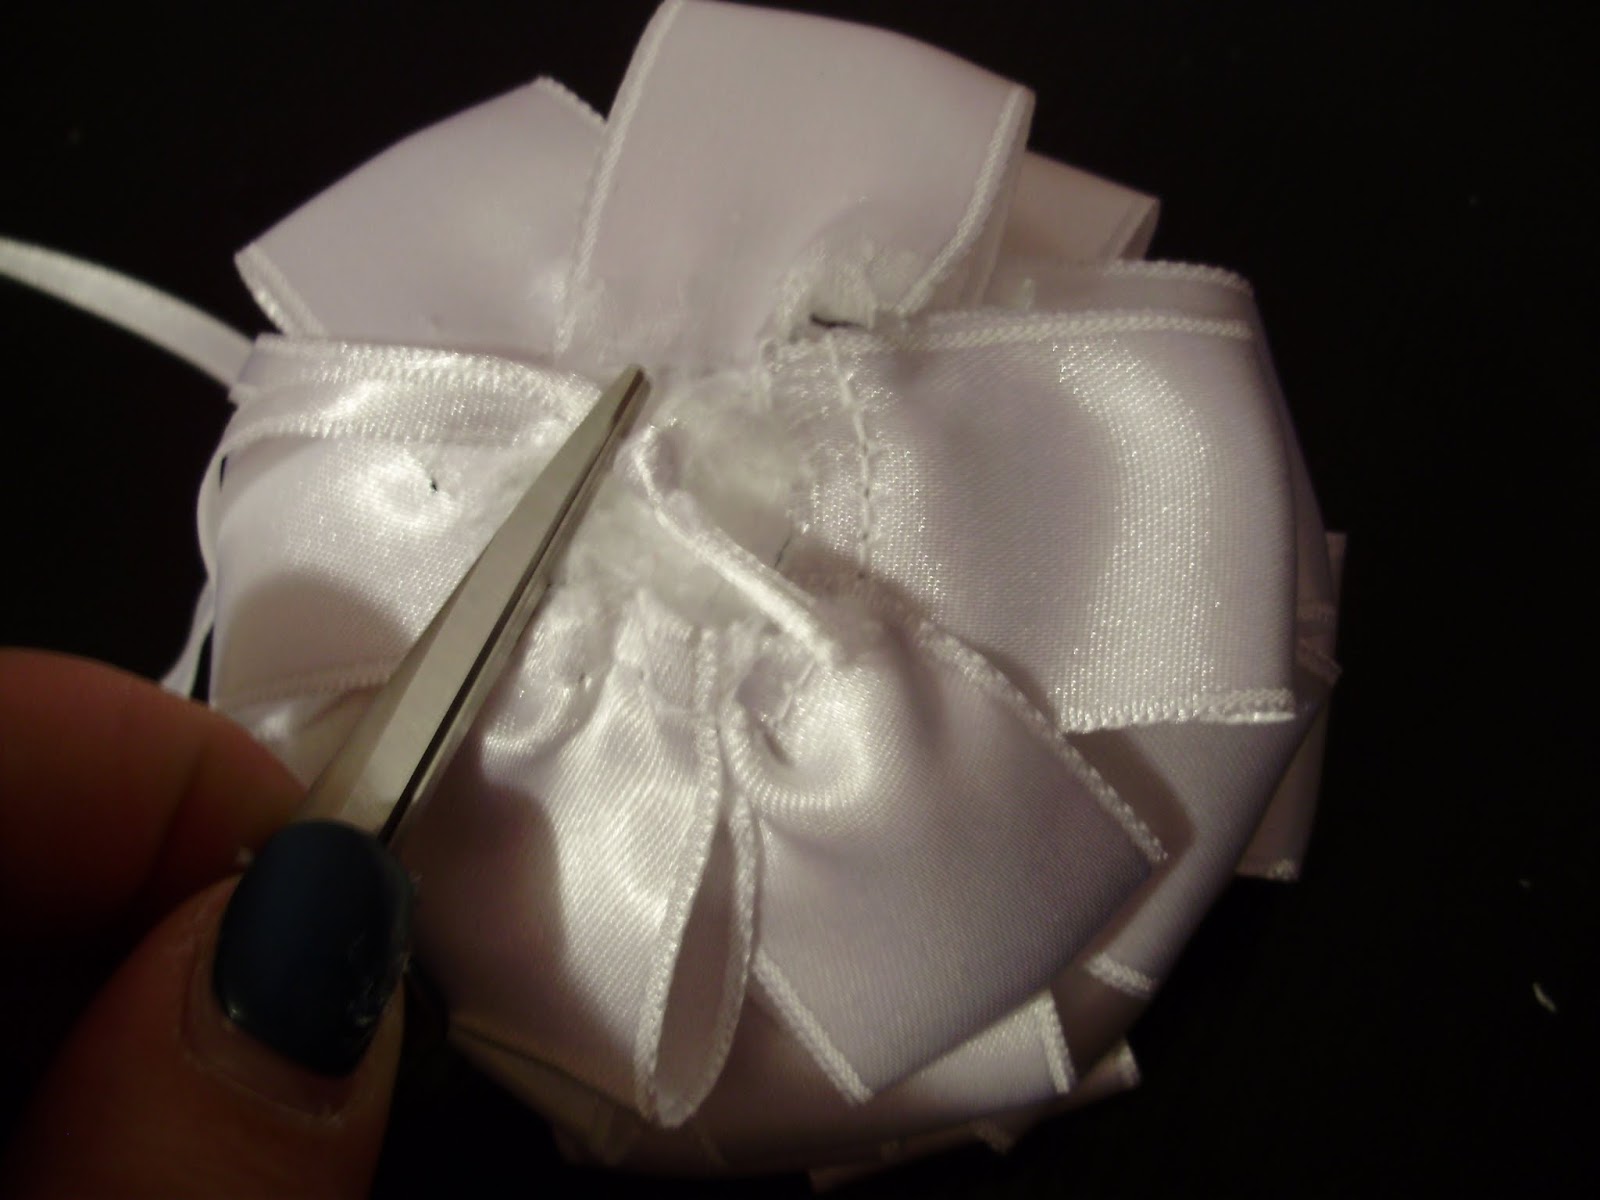

Fold the narrow ribbon in half and tide the ends in knot. Using scissors push the knot the in the hole. Secure with some glue.


Attach beads to cover any thread showing.

Your satin ball ornament is done. Now how hard was that :D.

If you wish, you can add more to your ball.


Check out the rest here

If you wish, you can add more to your ball.
Mix glitter powder and glue and with a brush dab it on the ball. Or you can use glitter glue and dab it with a brush. Or you can just spray it lightly whith glitter hair spray.


Leave it to dry well.


Check out the rest here
I apologize for the quality of some pics. They were all taken in different time of day/night and at different lighting.
Subscribe to:
Comments (Atom)